Table of Contents
Running and modifying the notebooks with Google Colab
A Google account is required
To use the notebooks served on Google Colab, you need to have a Google account and be logged into it. Without being logged into a Google account, you can only view the notebook and not run it.
Running a notebook for the first time
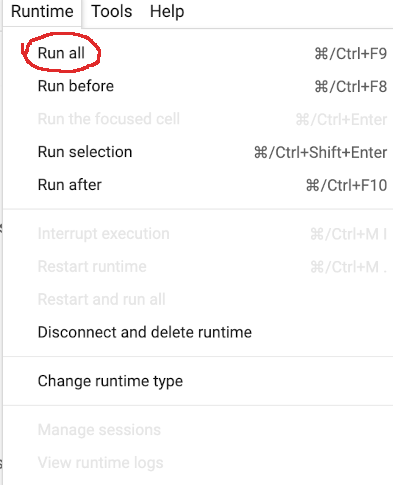
To run the notebook, click on the top menu option Runtime and then click Run all.
You may see the following warning:
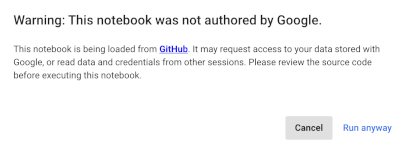
"Warning: This notebook was not authored by Google. This notebook is being loaded from GitHub. It may request access to your data stored with Google, or read data and credentials from other sessions. Please review the source code before executing this notebook."
And then it has two links, 'Cancel' and 'Run Anyway'.
Click 'Run anyway' to use notebooks
What the warning means
This warning is Google's way of asking for permission to use the notebook and asking the user if they trust the notebook. The notebooks are stored in the Keeling Curve GitHub repository and Google Colab is the environment used to run them. A reason not to trust a notebook is if the notebook has code in it permitting access to a user's Google drive and the user doesn't know the notebook creator. The Keeling Curve notebooks do not grant or access your Google Drive while running. If you do want to save your notebook changes, the Google Colab will ask to use your Google drive.
Making changes to the notebooks
The code in each notebook can be modified without affecting the original version which can be accessed on keelingcurve.ucsd.edu.
Anytime a change is made in the notebook, you must click on the menu option Runtime -> Run all to incorporate your changes.
Any changes to the notebooks can be saved to the user's Google Drive or the user's GitHub repository.
A notebook has text and code sections called cells
Text and code seen in the notebook exist in areas called cells. There are text cells and code cells. A text cell is accessed by double clicking on it to select if for editing. A code cell is accessed by clicking into the cell to select it for editing.
Selecting a cell to edit it
To access a cell to make changes, hover over text with your mouse and then double click it, and for code cells, just click inside. Double clicking on a text cell reveals text written in a language called Markdown which is used for formatting. To see how text can be formatted, see the Markdown guide at markdownguide.org.
If you change text or code in a cell, you can either use the menu option 'Run all' again, or while the cell is selected with your mouse arrow in the cell box, use the key combination shift+enter to run it. Using shift+enter runs that single cell and not the entire notebook.
Editing a cell
Text cells and code cells are selected differently for editing. Click once in a code cell to edit it and double click in a text cell to edit it.
Editing a text cell
Text is written using Markdown which is a set of text symbols used to create headers, bold text, and other format features. There is no color option or font size options with Markdown.
Editing a code cell
Code is written in python and can either be inside a function or outside of a function. To enable code to be in memory, you need to run it first. You can either run an individual cell or run all cells in the notebook.
Run a cell
Running a cell enables the Jupyter notebook to see the changes. With a cell selected, the user can click shift+enter on a cell to run it. With code in a cell, the code will run with shift+enter. A function in a cell will be loaded into the environment so that it's changes are picked up the next time a notebook is run. Code outside of a function will run right away.
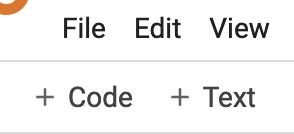
Adding a cell for text or code
To add a code or text cell, use the menu options '+ Code' and '+ Text'. This will add a code or text cell under the cell currently selected.
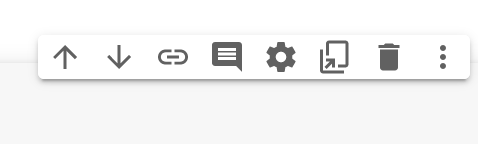
Deleting a cell
To delete a cell, click on it and In the right portion of the cell, a menu appears with a trash can icon which when clicked, will delete the cell.
Sample notebook of changes to make to a graphic
Here is a sample notebook with a walk through of what the functions do and how to modify them.
What is Google Colab?
The notebooks use Google Colaboratory (Google Colab) which is a service provided by Google that enables users to run Jupyter notebooks without any code installed on a local computer. Jupyter notebooks are files that use python code and that run in a browser.
With Google Colab, each notebook can be run to generate graphics seen on the home page of the Keeling Curve website and generate animations of select graphics.
More information about Goolge Colab can be found here.
Saving notebooks with Google Colab
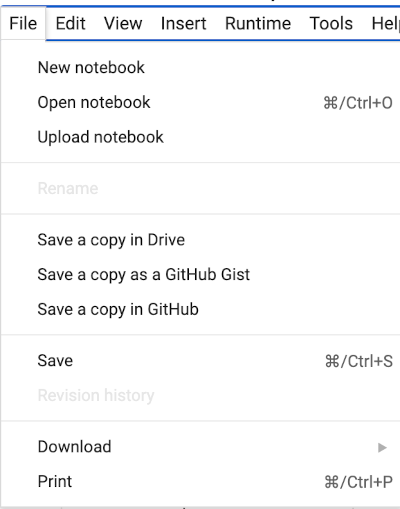
To save any changes made to the notebook, click on "Save a copy in Drive" in the File dropdown menu to save the notebook file to your Google drive. You can also save it to your GitHub repository. If you save the notebook to your Google Drive, the notebook will be stored on your drive in the folder called "Google Colab". To open it again in Google Colab, double click on the file link in the Google Colab folder.
See the following for more about saving Google Colab notebooks https://www.dummies.com/article/technology/programming-web-design/python/working-with-google-colaboratory-notebooks-262687/
Keeling Curve Notebooks access locations
Keeling Curve Jupyter notebooks can be accessed from two locations, either the overview page or from the Keeling Curve GitHub repository.
If a notebook is clicked on from the overview page, the notebook will open up in Google Colab.
If a notebook is clicked on from the GitHub repository, it opens a preview of the notebook, and the notebook is accessed by clicking on the Google Colab badge at the top of each notebook.
Running notebooks locally on a computer
You can download notebooks from the Keeling Curve GitHub repository to your computer and then run the notebook on your own computer. The best way to use a python notebook on your local computer is to create a python environment (see below).
Creating a local Python environment
A python environment is a way to separate different python versions and python package versions used for a coding project. With a python environment, you can start a new code project and use a different python version and different package versions without overwriting python versions and packages used in other code projects.
There are many ways to create a python environment. One way is to use pyenv to manage python environments https://realpython.com/intro-to-pyenv/. Or you can put your code in a Docker environment.